
Wednesday, May 2, 2012
SEWING KITS IN CANNING JARS
CAROUSEL HORSE BOXES

Monday, April 23, 2012
COFFEE CANS AND OLD BLUE JEANS

If you would like to create one too, just gather a few items that you probably already have at home;
1 large empty coffee can with plastic lid (save lid)
1 bluejean leg
1 small jean pocket...the small one that's inside the front jean pocket (the regular pockets might be too big)
Hot glue
Trims and lace for embellishments
 |
| This is the inside view, you can see the plastic lid at the bottom |
Cut the jean leg at the knee, slip it, hem side first, over the open end of the coffee can all the way down until the hem is flush with the bottom of the can. The jeans I was working with just so happened to fit snug on the coffee can. Tuck the top of the jean leg into the can, if it bunches too much at the bottom, trim it to where it lays flat on the bottom. Measure the inside bottom of the can then take the plastic lid, apply the measurement to it and trim off the excess until it fits snuggly into the inside bottom over the trimmed jean fabric, thus giving you a clean, smooth bottom in the can.. Glue the small pocket onto the outside, making sure not to glue it shut, and embellish away!!!
I'm making several to sell at the next craft show!!
Wednesday, February 8, 2012
FOOTBALL SPIRIT BRACELETS

Here's a list of supplies you'll need;
1mm diameter Stretch bead and jewelry cord
Jump rings
Football trinkets
Small cowbells
Needle nose pliers (for opening and closing jump rings)
Pony beads or Jewelry beads in your desired colors
All of these items can be found at most crafts stores or online.

Tray of supplies
Just simply cut a strand of the stretchy cord at desired length, leaving a few extra inches to allow for knotting.
Attach the jump rings onto the trinkets that you will be adding to the bracelet. Feed beads and football trinkets onto the cord until you reach the length you need, knot the cord a couple of times and trim off excess. Side a bead over the knot to hide it. Now you have made an awesome Football Spirit bracelet!! Add as many bells and trinkets as you like, the more the better!!
Friday, January 6, 2012
ALTERED CEREAL BOXES

One large to medium empty cereal box, scissors, ruler, pen, decorative papers or card stock, glue or paper adhesives, decorative embellishments and a bit of Hook and Loop fasteners (Velcro, for flap to close securely)
Pic #1 is of the cereal box cut to the size I needed for this project........
1. Take the cereal box and measure the size you would like the finished box to be, (I measured 6 inches from bottom to top) and draw a line across the front crosswise, and along both sides as well
2. Turn the box around to the back and measure 11 inches from bottom to top, draw a line across the back side crosswise, this side has to be longer than the front because it will serve as the flap that folds over the front
3. Using scissors or an X-Acto knife, carefully cut the box along the line you drew across the front side and also the two sides equally. DO NOT CUT THE BACK SIDE OF THE BOX (look at this first picture for reference)
Pic. #1

4. Referring to the back side of the box now, cut the line across the top of the box where you measured 11 inches high
You should now have your box looking like the one in my picture. Bring the flap over and fold across the front of the box like a flap for a purse. You can use a bone folder on the folds.
Pic. #2

You could also make it a purse by cutting slits on the top flap and slipping some ribbon though those slits then knotting the ends of each ribbon on the inside, leaving the ribbon long enough to use as a handle. Very cool!!
Here is the finished product!! I chose brown and cream colors, which go together nicely. I used cream ribbon to make a flower for the lower left side and for the bow on the upper right side.

Inside flap....you can see the Velcro dot used to secure the flap when its closed.

The polka dotted one you see in the picture below, was the very first one I ever made, the dots are glittered and sparkly. I used ribbon to make the flowers on the lower right side.

I used printed scrapbook paper with small polka dots for the inside. Notice the Velcro dots that I use to secure the flap when its closed.

Wednesday, December 14, 2011
'Thank You' card using paper bags
I created a 'Thank You' card from white paper bags using two bags, decorative papers, cricut cutouts, glitter, card stock and lots of white glue. Using only two paper bags made for an easy card to make. There are a lot of tutorials on Youtube on how to make cards using paper bags. My cousins Nora Flores and Norma Jasso showed my how to create these!! I love it!!!!


Monday, November 14, 2011
BROWN PAPER BAG ALBUM
I tried my hand at making a brown paper bag album this week. My wonderful cousin Norma W. Jasso gave me instructions on how to create one. Her sister Nora Flores, showed her how to make them. So thanks to my adorable sisters/cousins, I created one that I am really happy with.
This is the front cover.........


There are 5 pages, including the front and back cover, and 4 half pages. The full pages have side loading pockets as well. Love it!!! I can't believe this sweet album started out as plain old brown paper bags!!! I'm making lots more for gifts!!
Tuesday, July 12, 2011
FABRIC YOYO'S!

A very good friend of mine gave me a huge bag full of wonderful colorful fabric yoyo's she bought at a yard sale recently. Wow!!! I can't wait to use them...........I'm thinking of all kinds of ways to use them in my crafts!!!
Thank you Elsie for this wonderful bag of sunshine you gave me!!!!!!
Thursday, June 2, 2011
CINDERELLA Themed Quinceañera

My sister-in-law Olga and my niece Stephanie, owners of "Weaver's Thoughts" (an event decorating business), did a beautiful job decorating for a Quinceañera recently. A Quinceañera is the Hispanic tradition of celebrating a young girl's coming of age - her 15th birthday.
The theme was CINDERELLA. In the photo there is a beautiful horse drawn carriage, upon which the honoree sits and her escort sits in the chair to her right. I love the clock which is almost striking midnight and the two Royal Knights standing guard. It all looks so beautiful!! I just had to share this on my blog!
Saturday, April 30, 2011
WEDDING BOUQUET...FRESH SUNFLOWERS

For the same wedding as those two floral arrangements in the previous post. Very large and a little heavy bouquet, but the flowers were beautiful! Had to really secure those heavy fresh sunflowers with wire so they won't slip out of the oasis bouquet holder.
Friday, April 29, 2011
FRESH SUNFLOWERS!

Making two large fresh sunflower arrangements for a friend who is decorating for a wedding for tomorrow. These sunflowers are huge!! Using some leather leaf, baby's breath some ivy and these huge sunflowers. There arrangements are going to be placed on the altar at the church, then later at the reception.
Friday, April 8, 2011
WEDDING CARD

I created this card for a cousin, who just got married recently. I didn't want to make it too frilly or fru-fru, so this is was the end result.
Materials used;
Dark blue card stock cut down to 81/2" x 11"
Cream colored card stock
Printed card stock (for heart cutouts)
Dark blue mulberry paper (ripped it by hand)
Decorative paper edger
Fine glitter and glue
Wide black Sharpie marker (outline card and hearts)
Spray adhesive (I love to use "acid free" spray adhesives)
I used my PC to type and print the wording on the cream card stock, then hand ripped it to fit on the card front.
On the inside I glued down a piece of cream card stock that I ripped by hand and two smaller heart cutouts.

I could sit here and design and make cards ALL DAY LONG!! I love it!! But, alas, there is always something around the house that needs to get done!!
Friday, April 1, 2011
BIRTHDAY CARD

Made this birthday card for one of my granddaughter'today. I decided a carousel horse (clip art) would be just perfect. I cut a 12"x12" decorated scrapbook card stock page down to 8 1/2"x11" and folded it in half to make a card. I used the carousel horse graphic and colored it in with Prismacolor pencils and embellished with lots of sparklie glitter, some shaped brads, and added a couple of silk flowers. On the inside, I just cut out a piece of the same colorful cardstock paper and layered a smaller piece of white cardstock over it and then glued it all down to the inside, then added a silk flower on the upper left hand corner. I love making special cards for the special people in my life!♥

Monday, February 21, 2011
WEDDING BOUQUET

A while back,one of my relatives asked me to make a wedding bouquet for her wedding day, she wanted fresh cream colored roses in a round shaped bouquet. This was the end result, and I was happy with it and she totally loved it! We took this picture the day she came to pick it up.
Fresh floral wedding bouquets are not my area of expertise, but I gave it my best shot. You don't know what you can do unless you try, right? Love, love, love creating!!!
Friday, January 28, 2011
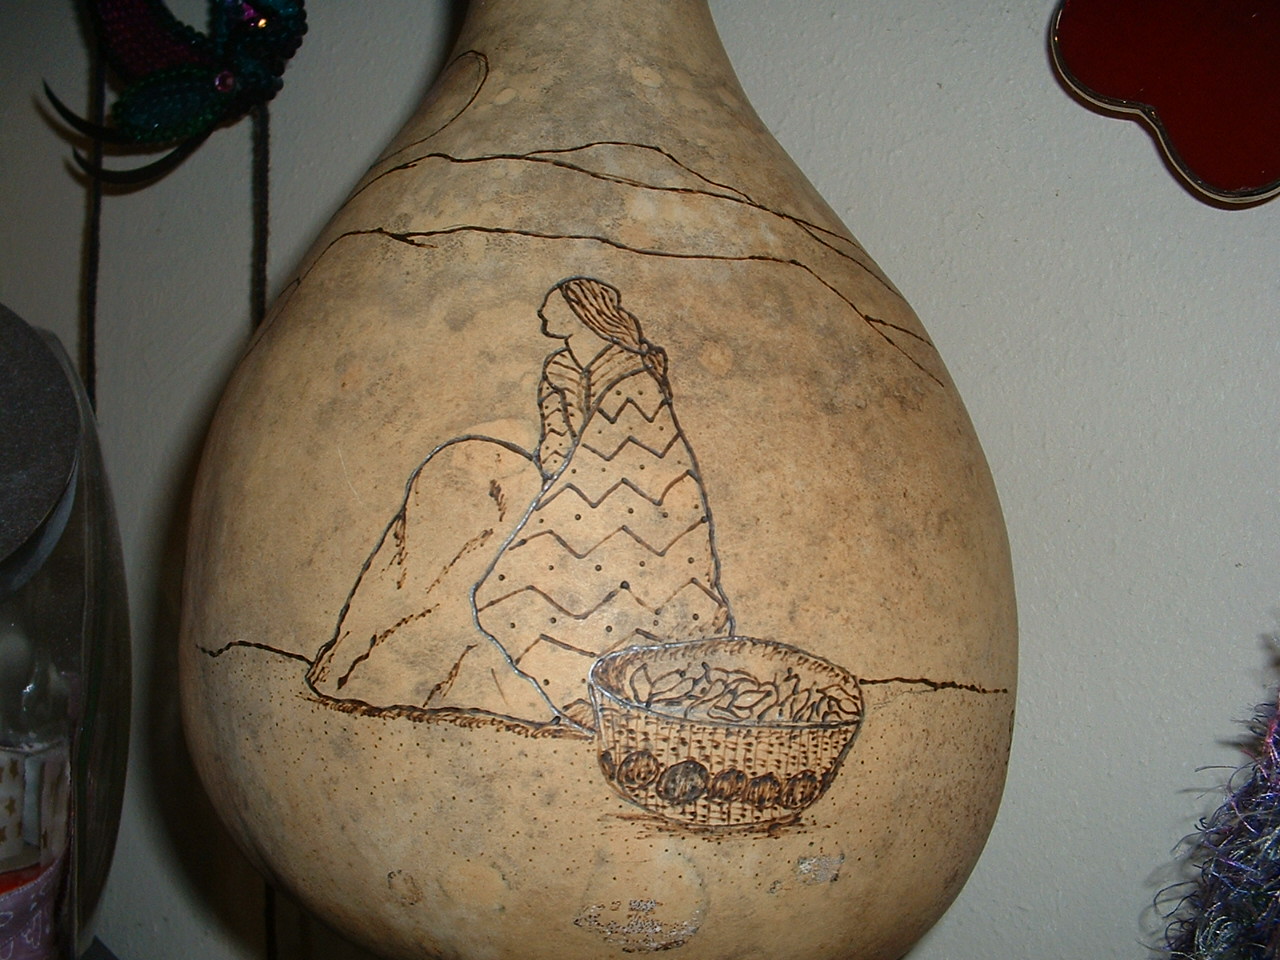
Gourd Art

I thought I would try my hand at creating art with something a little different, sketching in a design and do a little wood burning and applying some color on the surface of a dried gourd. I've had this one gourd for a while, it was fresh and green when I first got it and it had to be dried so I hung it up in the back corner of my patio away from rain and such, I left it there for about 4 months until it dried totally. I didn't like waiting such long time but what could I do, it takes a LONG time to dry. I asked my hubby to bore a hole in it for me because I thought it would make a really cute birdhouse and then I hung it in my craftroom. I stood back and looked at it then decided it needed to be altered with art!
So, the above picture is the finished project.
This was like a blank canvas.........

A Southwest design is what I had in mind and I sketched it, then burned it in with the wood burning tool. Those tools get really HOT! I accidentally gave my hand a minor burn! Ouch!


I used PRISMACOLOR Pencils, to add the color, they blend in so nicely.
Next, I'll be using a good spray sealer.
I need to get some more gourds to paint on!!!!!

Monday, January 24, 2011
Making more yummy cards...

Made a birthday card for my BFF, her birthday is in February. She LOVES collecting faux cupcakes, so I thought I make a card with a huge cupcake on it for her. I used a paper crimper and my Cuttlebug. Hope she likes it.
I also made a card for any occasion, I used a rubber stamp dragonfly and rubber stamp flower on this one. I used Prismacolor pencils to color them, then used Glossy Accents to highlight some areas. I don't think I will ever use a store bought card again!


Saturday, January 15, 2011
Fake Cake (Money Tree) #5

Another fake cake money tree for a Quincenera Celebration for this weekend.
This time the colors are Fuchsia, Black and White. I think that color combination is so pretty.
The ribbons are Grosgrain, nice vivid colors. I used glittery fuchsia tulle to make the skirt and hot glued it around the bottom of the cake, giving it a nice finished look. Made a large black bow for the cake topper. The cake is 25 inches tall, from the tip of the top feather to the bottom. It is 41 inches around the largest layer. It's pretty large and will accommodate lots and lots of birthday cards.
Complete instructions on how to make a money tree cake is in my blog archive dated October 21, 2009.
This is a close up view of the bottom layer.
 This is a close up of the fuchsia tulle skirt that is hot glued from underneath the cake.
 This the the top view, where you can see the slot for dropping in the well wishers cards.
Stepping back I realized that maybe it needed something more............perhaps some black feathers........hmmmm. I decided to add a few black feathers to the fuchsia ones and added feathers to the bow cake topper as well.
 Okay, I think that did the trick. I'm happy with it now. Hope they like it!
Saturday, January 8, 2011
Quick Wine Bottle gift wrap-up

If you have a bottle of Champagne or Wine you are going to present as a gift, this is a great way to wrap it up quickly and prettily. Using some mesh tulle glittery fabric, cut into a large square (making sure it will be more than about 8 or 10 inches bigger than enough to cover the bottle), lay the fabric on a table and place the bottle standing upright in the middle of it, then bring all four corners of the fabric together and gather it right on the neck of the bottle, underneath the top leaving the sealed top of the bottle above it. Tie a ribbon around it to secure it or use tape. Attach a pretty bow and some curly ribbon, add danglies or a gift tag. You can trim the top if it is too high over the bottle.
There you go, quick, easy and pretty wrapping. Leaving the top of the bottle free will allow it to be opened and used freely without tearing the wrapping off.
Subscribe to:
Comments (Atom)