Wednesday, September 18, 2019
FALL WREATH
Happy Fall Y'all!! I made this wreath last Fall, I want to put it up again but I have been looking for it in my storage room, craft room, all the closets, just about everywhere in the house and I can not find it!! I guess I'm going to have to make another Fall wreath for this year. I really don't know what could have happened to it. Hubby says he hasn't seen it either. Oh well, gotta keep an eye out for Hobby Lobby Fall floral sales!
CHEERLEADER OUFIT FOR A TWO YEAR OLD
Our lil' 2 year old niece wants to be a cheerleader!! Her 5 year old brother plays Soccer and she cheers for him from the sidelines! So, I decided to make a little cheer outfit for her, I bought
the t-shirt and tutu at Michael's and I used Tulip Glitter Dimensional Fabric Paints to embellish them.
She hasn't seen them yet but I just know she is going to LOVE them!!!
I'm also making a big Cheerleader bow for her hair and some pink pompoms to attach to her tennis shoes! She will look sooooooo cute!!
the t-shirt and tutu at Michael's and I used Tulip Glitter Dimensional Fabric Paints to embellish them.
She hasn't seen them yet but I just know she is going to LOVE them!!!
I'm also making a big Cheerleader bow for her hair and some pink pompoms to attach to her tennis shoes! She will look sooooooo cute!!
Thursday, July 11, 2019
MY NEW CHILDREN'S BOOK...
Hi! I have been working on my new Children's book for a while, and I have finished writing it!! Now, I am illustrating it myself! Not quite done with the illustrations yet, but here is a sneak peek of one of my illustrations....it's a Land Snail that "Danny" the main character in the story is imagining in his mind. The story is about a young boy who enjoys studying bugs.
Keep an eye on this space for updates on my new book!!
Labels:
Bugs,
Children's book,
Encourage Reading,
Story Time
Thursday, August 9, 2018
FAIRY ON CANVAS
I was feeling creative recently and this was the result! 16" x 20"
I made several but I liked this one the most. I gave it to a good friend of mine for her birthday. She loved it. :)
Mixed media, I made the fairy from wire and fibers and a wooden ball for the head. I used specialty yarn for the hair. I LOVE FAIRIES!!
I made several but I liked this one the most. I gave it to a good friend of mine for her birthday. She loved it. :)
Mixed media, I made the fairy from wire and fibers and a wooden ball for the head. I used specialty yarn for the hair. I LOVE FAIRIES!!
ANNOUNCING....my latest published book
Hi everyone! ANNOUNCING my new published book.....
ALANNA AND THE FOREST FAIRIES
I'm so excited to share the news!!! It is online at Amazon and Barnes and Noble!!!
Synopsis....
ALANNA AND THE FOREST FAIRIES
I'm so excited to share the news!!! It is online at Amazon and Barnes and Noble!!!
Synopsis....
Alanna is a sweet and curious 8-year-old girl. She lives with her family in a quaint cottage
at the edge of the Giant Tree Forest.
Alanna has heard about and is fascinated by fairies and has always hoped
to see one. She frequently visits with a
widow neighbor that lives on a small farm just over a knoll not far from her
home. The widow seems to know a lot
about fairies. Alanna has a kind heart and because of this the fairies favor
her and reveal themselves to her. One of
her delightful encounters with the fairies happens at a festival in a nearby
village that is held in honor of the elusive fairies.
Labels:
Children's books,
Children's stories,
Fairies,
Fairy Tales
Thursday, April 5, 2018
ARTSY WINE BOTTLE ART on canvas
![]() |
| ARTSY WINE BOTTLE ART 16" x 20" Canvas |
Hi! I am instructing an artsy class at an awesome Art Gallery downtown in a couple of weeks. Its a Make it and Take it workshop. We will be working on 16" x 20" canvases.
First step is to paint the background, (I used different hues of browns in this one). Then while the paint is still wet, the second step is to take sheets of plastic wrap and place it over all the wet paint, wrinkle it up a bit then pull it off. This technique leaves a really cool effect on the paint. I used a plastic stencil to make subtle effects on the paint as well. Then while the paint on the canvas is drying, use Mod Podge to glue cut up pieces of printed cardstock (of your choice) onto a large cardstock wine bottle shaped cutout. After all the pieces have been glued down, use a black sharpie permanent marker to outline each piece and the spaces in between to make it look like grout. Once the wine bottle cutout is complete, use Mod Podge to glue it down to the canvas, making sure it is completely adhered to the canvas.Once everything is dry, brush Mod Podge all over the canvas to seal it all down.
Then VoilĂ ! it's finished!
Thursday, March 22, 2018
Very cost effective, as opposed to buying an expensive ready made wreath!!
I used a grapevine wreath, 2 bunches orange Tiger Lilies, small yellow filler flowers, a hot glue gun with glue sticks and a hard cardboard Easter wall plaque. I placed everything where I wanted them and then hot glued them all down. I can't hardly wait to start on my Summer Time Wreath!!
Monday, March 5, 2018
DIAPER CAKE FOR BABY SHOWER
Hi! So glad you stopped by my Blog!
Here is a Diaper Cake that I made for a friend of mine a little while back. I hadn't realized that I hadn't added it to my blog, so here it is. I used newborn diapers and formed them into 3 different sized rounds, holding them in place with large rubber bands. Then I placed them one on top of the other, forming a 3 tier cake. I inserted a dowel rod down the middle through each tier all the way down (from the top down) to make sure they don't slide off each other. I then wrapped large burlap ribbon around each tier, same with matching twine, added some burlap ribbon bows I made. I stamped a cute owl on brown card stock, glued a burlap circle behind it then glued that to a larger round card stock and glued to the front top tier. Since it was going to be a girl, I used pink crinkle on top of each tier. The young couple loved it!!
Saturday, March 3, 2018
WALL DECOR
Hi guys! Here is a little grouping of items that I put together on my bathroom wall.
I bought the bicycle at Pier 1 Imports and the door and picture frame (with attached shelf) at Dollar General. The picture frame is for photos but I inserted an inspirational quote instead.
I think I will switch out the wreath on the door with seasonal themes.
I am so happy with how it all turned out. Total cost $11.00
I bought the bicycle at Pier 1 Imports and the door and picture frame (with attached shelf) at Dollar General. The picture frame is for photos but I inserted an inspirational quote instead.
I think I will switch out the wreath on the door with seasonal themes.
I am so happy with how it all turned out. Total cost $11.00
Wednesday, January 31, 2018
Teal and white Christmas wreath 2017
The wooden plaque is from Dollar Tree .
Saturday, November 4, 2017
TURKELFEN
This is what happened on my crafting table this morning!
The turkey head is off a headband with two turkey heads on it and the elf legs are a Christmas ornament I got at the Dollar Tree. I have Thanksgiving stuff and Christmas stuff on my crafting table and these two were on top of each other and that's when I saw it, so I glued it together and the Turkelfen was born!! LOL!!
Wednesday, October 25, 2017
SOCK SNOWMAN
I have seen sock snowmen on crafting sites and just love them. So, I decided I would try my hand at it! I went on Youtube and watched 5 or 6 tutorials on "How-to" create these awesome snowmen.
I got lots of information and tips. These are the supplies I went out and bought.....
White socks, men's large
Christmas Women's socks* for cap and scarf
Raw White rice for filling
Embroidery floss 1 skiem
Assorted Christmas embellishments, small, such as snowflakes, buttons etc.
Pink blush and small brush for applying blush, to give him or her rosy pink cheeks
Small black beads for eyes
Small Jingle bells
Red pompoms or any color you choose
Hot glue gun and glue sticks
(You can also use Fleece, Felt or Flannel to make the cap and scarf)*
Lay the sock flat and cut across just below heel.
You will be using the top part of the cut sock.
Turn it inside out. Gather it at the top and take a length of floss and tie it up tight. Make sure to tie it up really secure.
Turn it back right side out with the gathered end inside the sock.
Fill up the sock with rice. Push down on the rice and make sure it is firm and full.
(The snowman behind the rice jar is being snoopy, he wants to see what's going on)
Take a length of floss, gather the top and tie it securely. Trim floss.
Using your hands, form an indention for the neck area then use the floss to tie it while forming the neck. Tie it securely. Trim floss. The snowman form should be nice and firm. Do not make the neck too thin because it will flop over. Nobody wants a floppy headed snowman! Lol!
Use a Christmasy sock to make the knit cap, cut off a long enough piece of sock lengthwise for the scarf, tie it around the neck. Cut off part of the sock for the cap,( it will look like a tube) gather up one end making that the top of the cap and tie it with the floss, and fold up the other end to make the band of the cap. Glue a pompom onto the gathered top and add jingle bells .... or not. It's your choice. Once you have the cap positioned the way you want it on the head, glue the cap to secure it.
*You can also use Fleece, Felt or Flannel for the cap and scarf, but you might have to sew a little. I don't like to sew, I can't even sew a straight line nor do I want to! Ha!!
So, there you have it. Pretty easy right? And lots of fun!! Use black beads for the eyes, you may also add a nose and a mouth if you'd like to.
Now you can make more snowmen and decorate them with bells, buttons or bows to your hearts content!
Thank you for your interest! Have a blessed Christmas Season!
Sylvia
I got lots of information and tips. These are the supplies I went out and bought.....
White socks, men's large
Christmas Women's socks* for cap and scarf
Raw White rice for filling
Embroidery floss 1 skiem
Assorted Christmas embellishments, small, such as snowflakes, buttons etc.
Pink blush and small brush for applying blush, to give him or her rosy pink cheeks
Small black beads for eyes
Small Jingle bells
Red pompoms or any color you choose
Hot glue gun and glue sticks
(You can also use Fleece, Felt or Flannel to make the cap and scarf)*
Lay the sock flat and cut across just below heel.
You will be using the top part of the cut sock.
Turn it inside out. Gather it at the top and take a length of floss and tie it up tight. Make sure to tie it up really secure.
Turn it back right side out with the gathered end inside the sock.
(The snowman behind the rice jar is being snoopy, he wants to see what's going on)
Take a length of floss, gather the top and tie it securely. Trim floss.
Using your hands, form an indention for the neck area then use the floss to tie it while forming the neck. Tie it securely. Trim floss. The snowman form should be nice and firm. Do not make the neck too thin because it will flop over. Nobody wants a floppy headed snowman! Lol!
Use a Christmasy sock to make the knit cap, cut off a long enough piece of sock lengthwise for the scarf, tie it around the neck. Cut off part of the sock for the cap,( it will look like a tube) gather up one end making that the top of the cap and tie it with the floss, and fold up the other end to make the band of the cap. Glue a pompom onto the gathered top and add jingle bells .... or not. It's your choice. Once you have the cap positioned the way you want it on the head, glue the cap to secure it.
*You can also use Fleece, Felt or Flannel for the cap and scarf, but you might have to sew a little. I don't like to sew, I can't even sew a straight line nor do I want to! Ha!!
So, there you have it. Pretty easy right? And lots of fun!! Use black beads for the eyes, you may also add a nose and a mouth if you'd like to.
Now you can make more snowmen and decorate them with bells, buttons or bows to your hearts content!
Thank you for your interest! Have a blessed Christmas Season!
Sylvia
Labels:
Christmas crafts,
Christmas decor,
Snowman,
sock snowman
Tuesday, October 24, 2017
CHRISTMAS LOLLIPOPS
This is a great idea for Christmas Secret Santa gift or give away when you have guests come visit during the Christmas Season. It makes a perfect Christmas gift from your child to their teacher too!
All you need is.....
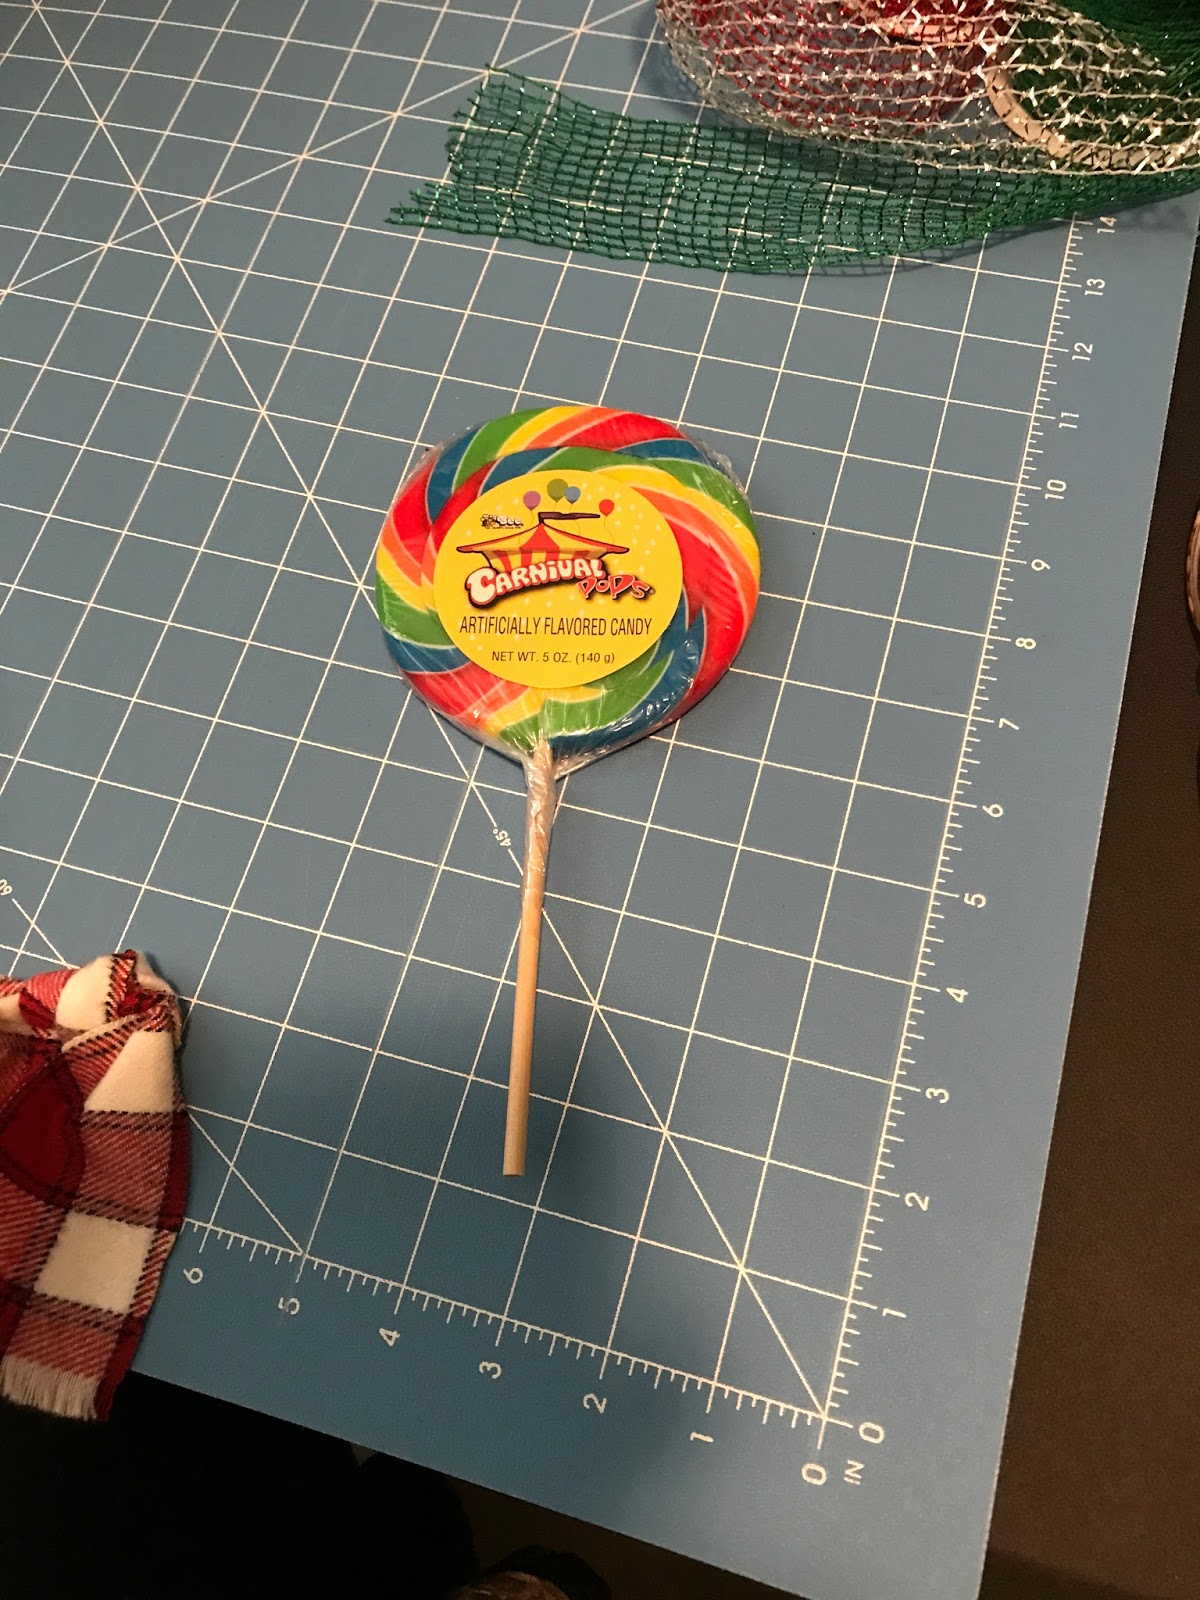
Large Lollipop 4" x 4" (I find these at Dollar Tree)
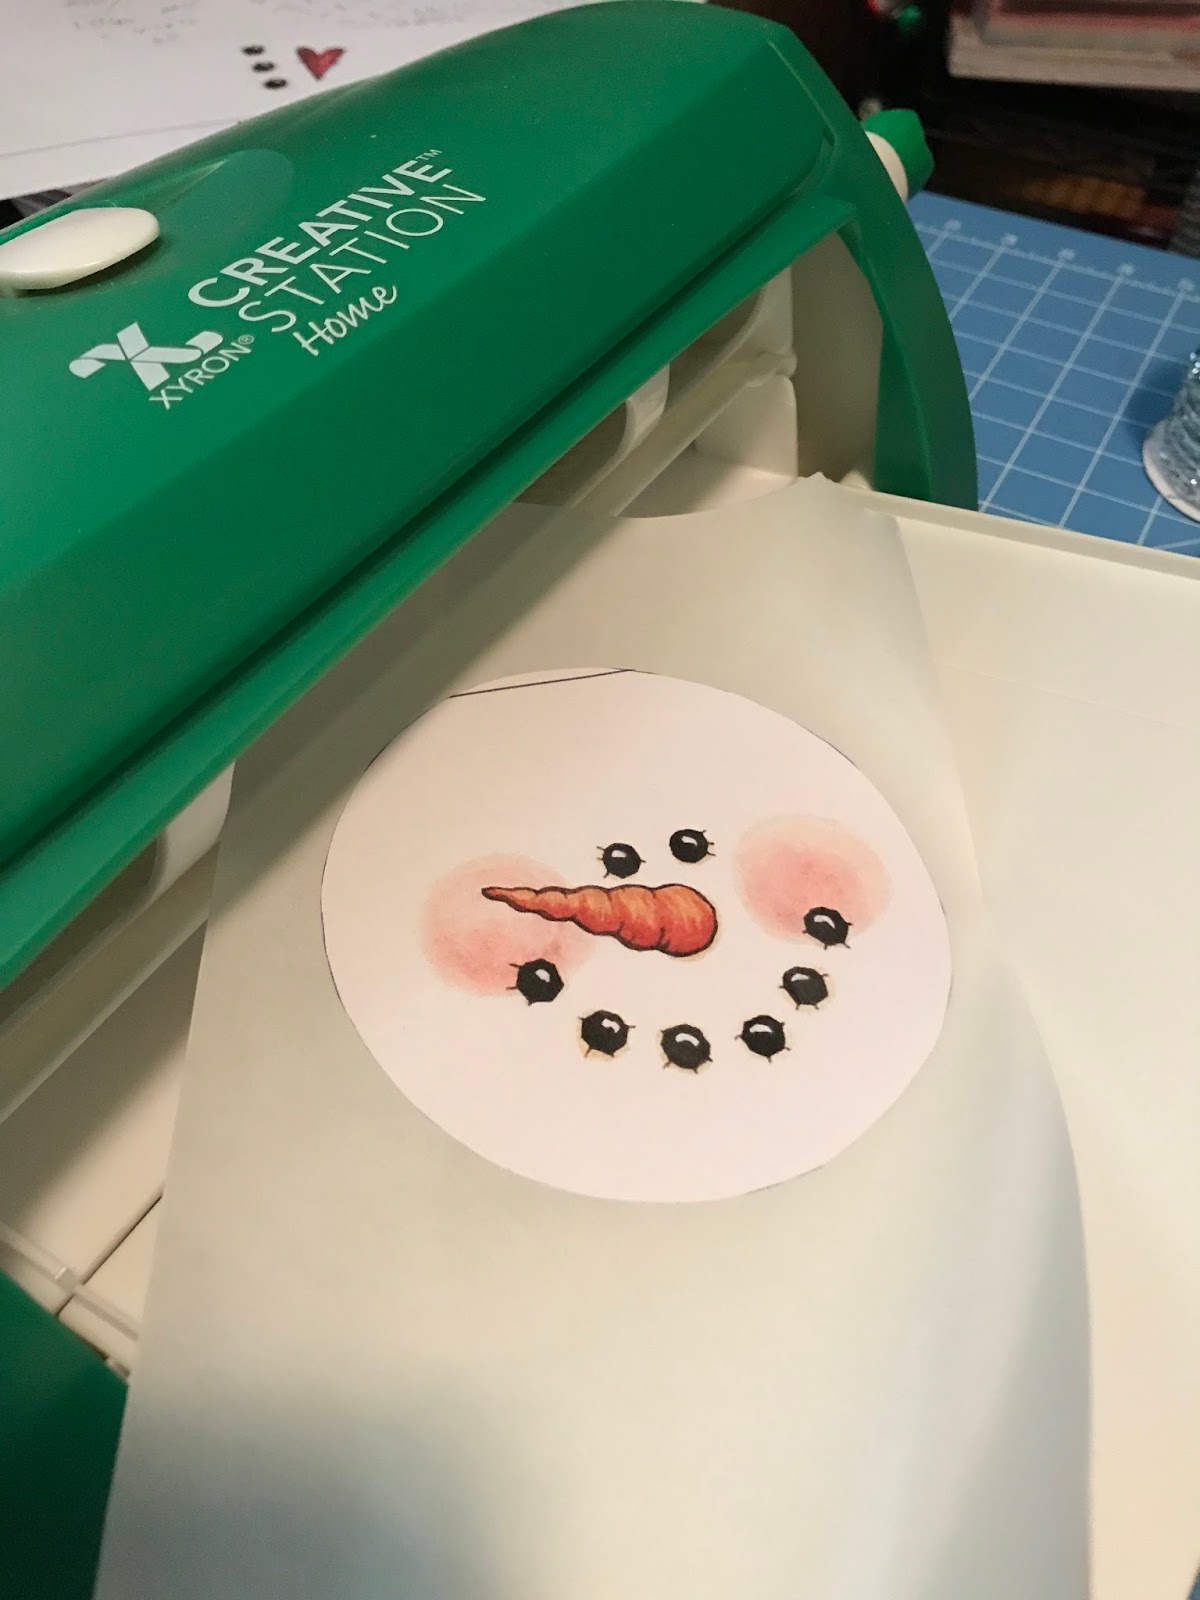
Snowman face (you can draw it or get free clip art from the internet)
White copy paper
Adhesive to attach snowman paper face to lollipop
Fleece, Flannel or Felt for cap and scarf
Jingle bells
Christmas ribbon
Christmas embellishments
Embroidery floss small amount (color to match cap/scarf)
Hot glue/glue gun
The large lollipops are a dollar each at the Dollar Tree. Do not remove the plastic wrapper from the lollipop. Do not remove the front or back label, as the front one will be totally covered with the snowman face. The ingredient label on the back, should remain intact.
Search the internet for Free Snowman candy wrapper templates, save to your computer, size them and print them. Or you can just paint the face yourself. Cut it out and make sure its just a little bit smaller than the lollipop. Use double sided adhesive tape or run it through a sticker maker, then adhere to the front side of the lollipop, leaving the ingredient list intact on the backside.
Hat......
I used a piece of plaid flannel cut to 10 inches lengthwise by 7 inches wide. Please refer to the photo to see placement. Fold about 1 inch up twice lengthwise to create the cap band. Positioned it on the lollipop, just over the eyes, flip it over, overlap the sides on the back and glue it together. Tack the cap onto the lollipop every inch or so with the hot glue to keep it from sliding off. Gather the top of the cap, use the embroidery floss to tie it up, leaving an inch or so of the fabric at the top, fluff it up, tie some ribbon and 2 jingle bells to it.
Scarf....
Cut a strip of 1 and 1/2 inches wide by 10 inches long of the fabric for the scarf, tie it around the stick just below the lollipop, position like a winter scarf and hot glue it.
Add snowflakes or embellishments of your choice to add your finishing touches.
And there you have it!!!
If you look a little further down in my blog, you will see some I made with a Halloween theme last year. They are pretty cool too!
Hope you have as much fun as I did making these! Make them for your friends and family. They will love them!
All you need is.....
Large Lollipop 4" x 4" (I find these at Dollar Tree)
Snowman face (you can draw it or get free clip art from the internet)
White copy paper
Adhesive to attach snowman paper face to lollipop
Fleece, Flannel or Felt for cap and scarf
Jingle bells
Christmas ribbon
Christmas embellishments
Embroidery floss small amount (color to match cap/scarf)
Hot glue/glue gun
The large lollipops are a dollar each at the Dollar Tree. Do not remove the plastic wrapper from the lollipop. Do not remove the front or back label, as the front one will be totally covered with the snowman face. The ingredient label on the back, should remain intact.
Search the internet for Free Snowman candy wrapper templates, save to your computer, size them and print them. Or you can just paint the face yourself. Cut it out and make sure its just a little bit smaller than the lollipop. Use double sided adhesive tape or run it through a sticker maker, then adhere to the front side of the lollipop, leaving the ingredient list intact on the backside.
Hat......
I used a piece of plaid flannel cut to 10 inches lengthwise by 7 inches wide. Please refer to the photo to see placement. Fold about 1 inch up twice lengthwise to create the cap band. Positioned it on the lollipop, just over the eyes, flip it over, overlap the sides on the back and glue it together. Tack the cap onto the lollipop every inch or so with the hot glue to keep it from sliding off. Gather the top of the cap, use the embroidery floss to tie it up, leaving an inch or so of the fabric at the top, fluff it up, tie some ribbon and 2 jingle bells to it.
Scarf....
Cut a strip of 1 and 1/2 inches wide by 10 inches long of the fabric for the scarf, tie it around the stick just below the lollipop, position like a winter scarf and hot glue it.
Add snowflakes or embellishments of your choice to add your finishing touches.
And there you have it!!!
If you look a little further down in my blog, you will see some I made with a Halloween theme last year. They are pretty cool too!
Hope you have as much fun as I did making these! Make them for your friends and family. They will love them!
Monday, October 23, 2017
THANKSGIVING WREATH 2017
TIP....I found it very helpful to use my artist easel to hang it on while I worked on the wreath.
Labels:
Fall wreaths,
Mesh wreaths,
Thanksgiving wreath,
wreaths
Wednesday, April 19, 2017
Saturday, October 17, 2015
Halloween and Dia de los Muertos Lollipops
![]() |
| These are pretty large. 4" x 4" around. |
I know my friends and family will just love them!!!
![]() |
| These are smaller, 2 1/2" x 2 1/2" around. |
Sunday, August 30, 2015
YAY, HAIR BOWS!
Hi guys!! I'm excited about some hair bows I've been creating!! Everyday bows and lots of Halloween ones too!! Hopefully they will sell at a craft sale I'll be at next month!! I have been learning from some awesome tutorials on Youtube. If you'd like to learn how or to brush up on your bow making skills, just go to Youtube and click in "how to make a hair bow" and hundreds of tutorials come up!! Love Youtube!!
Here are some of my bows......
![]() |
| Colorful |
![]() |
| Sweet |
![]() |
| Spooky! |
![]() |
| More spooky! |
![]() |
| These are pin back buttons, I did the graphics on my computer then made the pins and added ribbon bows and trinkets. |
![]() |
| Even more spooky! |
![]() |
| Football Spirit and others |
Labels:
everyday hair bows,
hair bows,
Halloween hair bows,
Ribbon,
ribbon bows
Sunday, June 14, 2015
WORTH REPEATING.....4TH OF JULY DOOR WREATH.
Here's a really nice festive wreath you can make for the 4th of July!
It's a straw wreath that's covered in red, white and blue bows, just make a bunch of florist bows, using water proof ribbons, which are available at floral supply places, attach them to the wreath with wire or floral picks, position the colored bows to resemble the American flag. You can add a small flag, glittered stars and sprigs of metallic embellishments. It's very easy to make and it looks great on the front door!
Hope you all have a very happy 4th of July!!! Stay safe!!
Labels:
4th of July,
american flag,
red,
white and blue wreaths
Monday, April 20, 2015
My Book...Sarah and the Little Spider Prince
![]() |
| Sarah and the Little Spider Prince |
It was like a dream!!! Thanks to God, it is actually a dream come true!!!
It's called "Sarah and the Little Spider Prince" The illustrator who did the art is so, so very talented and did an absolutely, wonderful outstanding job!!! Go see it at Amazon.com!!!
Tuesday, April 14, 2015
Recycle Your Old Blue Jeans
| I created this one by using a recycled blue jean mini skirt. |
| This one is Teal ribbon and ruffle with white stars. I think I'm going to add some sparkle to it. |
Labels:
Fabric glue,
Hot glue gun,
Old blue jeans,
Recycle blue jeans,
Ribbon,
Ruffle
Monday, March 16, 2015
St. Patrick's Day Charming Necklace
I decided to create a (green) necklace to wear on St. Patrick's Day to keep from getting pinched. So I hunted through my collection of vintage jewelry and found this pendant that was missing the jewel. It's two inches tall by one and a half inches wide. Perfect. I used Glossy Accents to adhere fine green glitter along the inside edge of the pendant, then fine white glitter in the center. Meanwhile that dried, I made a very tiny label on my PC and used clear tape to attach it to a very tiny glass vial. Which I then filled with fine green glitter (Lucky Dust) and sealed with a cork. Then I applied a couple of drops of gel superglue onto the back of the vial and set it onto the center of the pendant. I love using the gel (as opposed to liquid) superglue because it doesn't run and it sets instantly. After that was all done, I went back into the vintage jewelry, pulled out a couple of green beaded necklaces, took them apart and created one that matches perfectly! So, there it is. A very charming necklace, perfect to wear on St. Patrick's Day!!
After St. Patrick's Day, I think I will remove that label and replace it with one for Halloween, one that will say something like....."Eye of Newt Powder" or "Magic Spell dust" or something a little more spooky!
Yay! I love it!!!
Friday, February 20, 2015
CROCHETED FLOWER HEADBANDS
I decided to make some cute crocheted headbands with a crocheted flower on it because my little niece has been asking me to make one for her. I did not have a pattern but I crocheted a regular headband and went online for a flower pattern, there are sooo many tutorials about that on youtube and so I took the basics and added my own idea to complete it. I am happy with the final results. I'll be making more of these in different colors for my niece and maybe add some sparkling rhinestones or other embellishments to the flowers.
If you would like some instructions on crocheting these, search for them on youtube and watch the tutorials. They are super informative!!
Labels:
Crochet,
Crochet flower headbands,
Crochet headbands
Tuesday, January 27, 2015
NAUTICAL PARTY DECORATIONS
![]() |
| Tabletop centerpieces. These were a work in progress when this picture was taken. |
![]() | |||||
| The photo prop. The sand filled buckets were topped with seashells later. |
The photo prop was a little harder to create. A ready made Styrofoam blank frame at a floral supply place was expensive, so we opted to purchase an 8ft x 4ft Styrofoam Panel at Home Depot for $13.00. My sweet hubby cut it down to 4 feet wide and 3 feet high then cut out a square opening in the center leaving an 8 inch border all around. We glittered the frame and attached all the cutouts, we had previously glittered the letters for the wording. I used LOW temp hot glue because the hot temp hot glue will melt the Styrofoam.
The party was awesome and lots of guests took pictures of themselves in the photo frame!
Subscribe to:
Posts (Atom)