Friday, January 28, 2011

Gourd Art


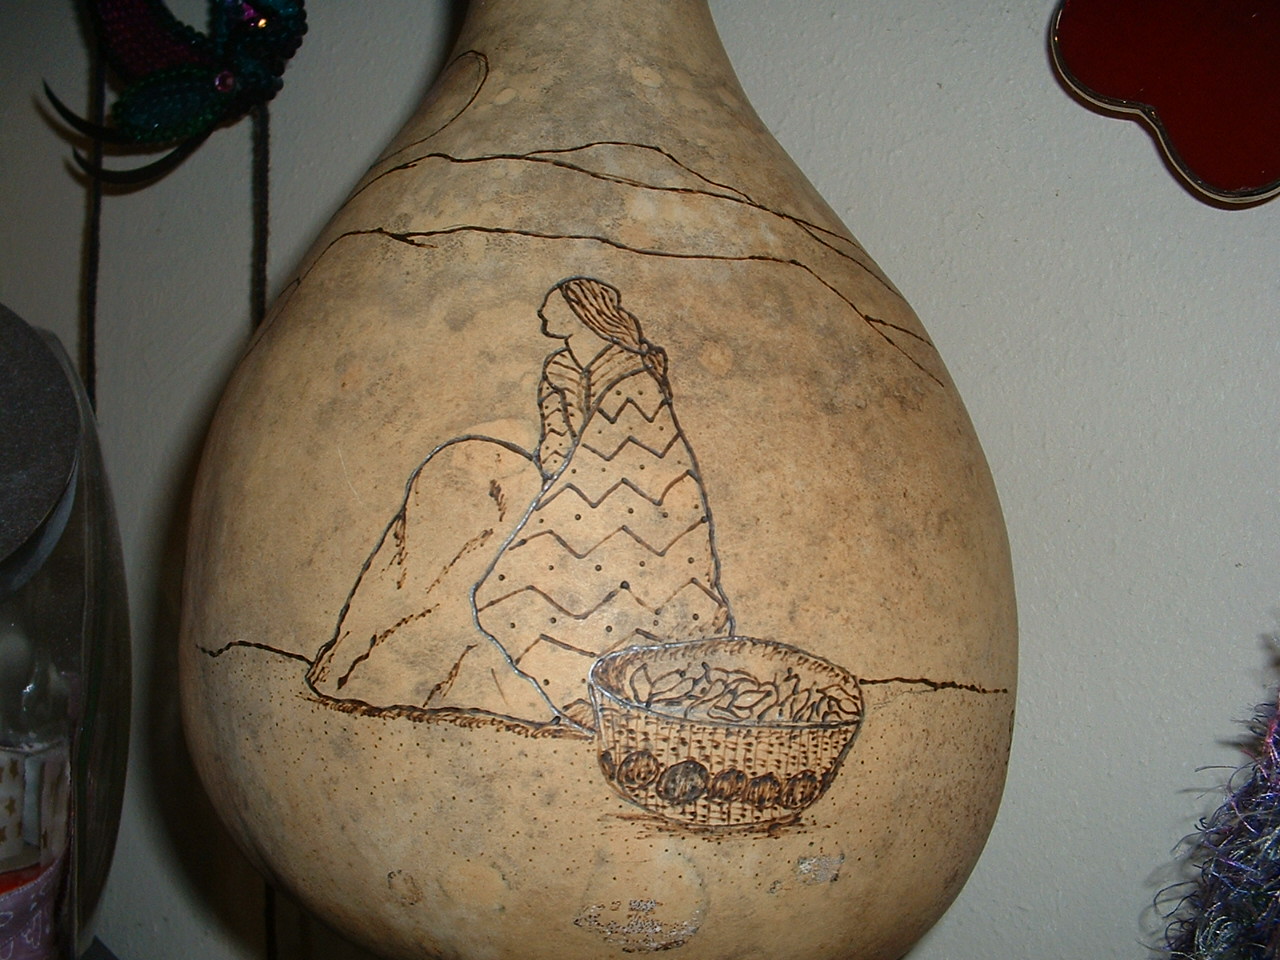
I thought I would try my hand at creating art with something a little different, sketching in a design and do a little wood burning and applying some color on the surface of a dried gourd. I've had this one gourd for a while, it was fresh and green when I first got it and it had to be dried so I hung it up in the back corner of my patio away from rain and such, I left it there for about 4 months until it dried totally. I didn't like waiting such long time but what could I do, it takes a LONG time to dry. I asked my hubby to bore a hole in it for me because I thought it would make a really cute birdhouse and then I hung it in my craftroom. I stood back and looked at it then decided it needed to be altered with art!
So, the above picture is the finished project.

This was like a blank canvas.........
A Southwest design is what I had in mind and I sketched it, then burned it in with the wood burning tool. Those tools get really HOT! I accidentally gave my hand a minor burn! Ouch!


I used PRISMACOLOR Pencils, to add the color, they blend in so nicely.
Next, I'll be using a good spray sealer.
I need to get some more gourds to paint on!!!!!


Monday, January 24, 2011

Making more yummy cards...


Made a birthday card for my BFF, her birthday is in February. She LOVES collecting faux cupcakes, so I thought I make a card with a huge cupcake on it for her. I used a paper crimper and my Cuttlebug. Hope she likes it.
I also made a card for any occasion, I used a rubber stamp dragonfly and rubber stamp flower on this one. I used Prismacolor pencils to color them, then used Glossy Accents to highlight some areas. I don't think I will ever use a store bought card again!

Saturday, January 15, 2011

Fake Cake (Money Tree) #5


Another fake cake money tree for a Quincenera Celebration for this weekend.
This time the colors are Fuchsia, Black and White. I think that color combination is so pretty.
The ribbons are Grosgrain, nice vivid colors. I used glittery fuchsia tulle to make the skirt and hot glued it around the bottom of the cake, giving it a nice finished look. Made a large black bow for the cake topper. The cake is 25 inches tall, from the tip of the top feather to the bottom. It is 41 inches around the largest layer. It's pretty large and will accommodate lots and lots of birthday cards.

Complete instructions on how to make a money tree cake is in my blog archive dated October 21, 2009.

This is a close up view of the bottom layer.
This is a close up of the fuchsia tulle skirt that is hot glued from underneath the cake.
This the the top view, where you can see the slot for dropping in the well wishers cards.

Stepping back I realized that maybe it needed something more............perhaps some black feathers........hmmmm. I decided to add a few black feathers to the fuchsia ones and added feathers to the bow cake topper as well.
Okay, I think that did the trick. I'm happy with it now. Hope they like it!

Saturday, January 8, 2011

Quick Wine Bottle gift wrap-up


If you have a bottle of Champagne or Wine you are going to present as a gift, this is a great way to wrap it up quickly and prettily. Using some mesh tulle glittery fabric, cut into a large square (making sure it will be more than about 8 or 10 inches bigger than enough to cover the bottle), lay the fabric on a table and place the bottle standing upright in the middle of it, then bring all four corners of the fabric together and gather it right on the neck of the bottle, underneath the top leaving the sealed top of the bottle above it. Tie a ribbon around it to secure it or use tape. Attach a pretty bow and some curly ribbon, add danglies or a gift tag. You can trim the top if it is too high over the bottle.
There you go, quick, easy and pretty wrapping. Leaving the top of the bottle free will allow it to be opened and used freely without tearing the wrapping off.

Thursday, December 16, 2010

Handmade Christmas Cards....


Here are a couple of Christmas cards I created for two of my adorable grandkids....I used my cuttlebug, ribbon, glitter, brads and some cute Christmas cutouts. Love it!!!

Saturday, December 4, 2010

GINGERBREAD MAN CHRISTMAS WREATH

I'm back with a simple Christmas wreath idea, this is the wreath I made yesterday and hung above the fireplace. I took a large wire wreath form, wrapped green tree branch garland all around, added colorful mini lights, then filled it up with bright, shiny round colorful ornaments and fake Christmas candy and candy floral picks and then positioned a soft sculpture gingerbread man in the center. Added a florist bow to finish it off, and it's done! I love that it is so large and colorful. Very easy to make. Making your own is so much cheaper than buying a ready made one. Dig through your Christmas decorations boxes and use items you already have on hand, like extra ornaments and Christmas floral picks, etc. and let your imagination take over!

Friday, December 3, 2010

Give-away by Becky Conley

Check out this awesome give-a-way by Becky Conley!!

Time:5:30PM Thursday, December 2nd

Tuesday, November 23, 2010

POTPOURRI PIE (faux)


I really enjoy making unique holiday decorations and this is one that I love making and giving as gifts to my friends and family to enjoy throughout the festive season.
It is a pie.....a fake pie that looks and smells real!
I use a glass or ceramic pie dish, that they can use later for actual baking.
Here are supplies that you will need to make one for you to display or to give as a gift (this would make a wonderful Hostess gift):

1 ceramic or glass pie dish
1 package potpourri (vanilla, or cookie/pie scent)
12x12 square brown netting (or tulle)
2 12x12 pieces of light brown or tan felt
ground cinnamon
Low Melt Hot glue gun and glue sticks (use care when using hot glue)
pinking shears
regular scissors

Place the contents of the potpourri bag into the the glass pie dish. Remove the pieces of the potpourri that are too bulky or large (or break them up into smaller pieces). Hot glue the netting onto the pie dish over the potpourri by placing a dot of the hot glue on the rim of the dish every inch or so, using care not to touch the hot glue, press the netting in place, making sure the netting is taut as you make you way around, after the netting is glued down completely around the dish use scissors and trim off the excess netting that extends over the rim of the dish.
Use the pinking shears to cut felt into 10 strips, 12 inches long and 3/4 inch wide. Place 5 strips evenly spaced over the netting and place 5 strips in the opposite direction, weave them to create the lattice (refer to picture). Glue the strips down at the point where they meet the rim of the dish. After all the strips are glued down, trim the excess felt that extends over the rim.
Using the regular scissors cut about 5 or 6 strips of felt 12 inches long and about an inch wide.
Refer to the picture and start to hot glue the strips around the rim of the dish, one at a time, fluting as you go along to make it look like a fluted edge on the pie.
Once you have finished, sprinkle cinnamon all over the pie as you would for a real pie.
After that you will have a pretty realistic, wonderful smelling fake pie to place on your table or counter for a long lasting fall or Christmas decoration (or for anytime).


Thursday, November 18, 2010

CAROUSEL HORSE APRON

Here's what you need:
1. Ready made apron, any color and size you wish
2. Glitter dimensional fabric paint (assorted colors)
3. Fusible webbing (follow manufacturers instructions)
4. Iron (dry iron no steam)

This is an apron I had fun embellishing not too long ago. The apron is from Michael's, just solid purple (my favorite color) and I wanted to do something special with it. In my fabric stash there was some fabric with these beautiful carousel horses printed on them. I ironed some fusible webbing on back of the fabric and then carefully cut out the three prettiest carousel horses. I ironed them onto the apron, and when they cooled off, I used the glitter dimensional fabric paint all around the entire outline of the carousel horses as well as the mane, tail, saddle and other areas on the horse. Then with the same glitter paint application I wrote words having to do with carnivals all over the apron. Let it dry overnight. I really liked the way it turned out. It's completely washable. Great for a kids craft, with adult supervision of course.

Sunday, November 14, 2010

FLOWERS EVERYWHERE!

Whew, been really busy these last couple of days, I've been helping a very good friend of mine (a florist) prepare flowers for a big wedding for this weekend. This bride wanted lots and lots of beautiful flowers, which she got!


Beautiful Wedding Bouquet, she made with many white roses.
She used lots and lots of beautiful, wonderfully scented flowers! She is a very talented floral designer!

Monday, November 1, 2010

ALTERED BOOK....3D CHRISTMAS


Great Recycling Project!!

Do you remember making Christmas Trees out of Readers Digest publications, where you fold each page into itself twice then fold the bottom flap up? Well, here is a great twist on that craft, using a hardback book. Do NOT remove the hardback book cover, it is part of the project, the pages will remain attached to the book cover.
I took the hardback book, (with maybe 185 to 200 pages) and folded each page that same way (as mentioned above). Books with more pages than that will be too many and you will end up ripping pages out.   I then spray painted the inside flaps and the Christmas tree 'Hunter Green' and spray painted the entire outside cover with Matte Black. You can use a gold metallic marker to write anything you like on the outside cover. I wrote 'Merry Christmas'.
As you can see, it is only half a tree, still attached to the book cover.
Side view
Using gold metallic marker, write anything you like.
After folding and spray painting I waited for it to dry thoroughly, maybe 1 hour. I then took some Christmas scrapbooking papers, cut them to size and glued them down to the inside flaps using white glue. Then came the fun part! The embellishments!! You are only limited by your imagination...I recycled old Christmas cards by cutting out and using the graphics and the inside greeting, but you can use die cuts, photos, anything your heart desires!! Photographs would work perfect!! You may decorate the tree by gluing Christmas trinkets all over it. I used low-melt hot glue.This is a simple and wonderful craft you and your kids can make together. I think grandparents would love a gift like this from their grandkids especially if there are some photographs involved!!

Saturday, October 9, 2010

BABY SHOWER fake cake (money tree)

Made another fake cake (money tree) for a baby shower this weekend. For "It's a girl", pink and white. It looked so cute with the Kewpie Doll cake topper, got that at Hobby Lobby.
I love creating and making things for baby showers!!
This cake is 25 inches tall from the base to the top of the Kewpie doll's head and 41 inches around the larger cake part (bottom layer).

View of cake top. Slot for the cards to be dropped into.

Friday, October 1, 2010

Embellished Journal


I embellished the cover on this journal for the daughter of a friend of mine. Gave it to her for her birthday, she loved it I am happy to say. I used textured papers, rubber stamps, dimensional objects, beads and colorful fibers. Personalized it with a metal star tag with the initial of her first name. I think I will start making more for Christmas gifts.

Monday, September 20, 2010

KNITTING A SCARF


I taught myself how to knit from reading instruction books. I am not an expert by any stretch of the imagination, but I have been working on a fluffy colorful scarf for one of my little grand daughters. I am using two strands of nubby and textured yarns together, giving it a very soft and textured feel. Can't hardly wait to finish it and send it off to her.

Saturday, September 18, 2010

HOT, HOT SALSA!


Darling hubby whipped up a batch of really, really hot salsa and my tongue is numb from one little itty bitty taste! I'm no stranger to hot salsa, but this is TOXIC HOT!!!
He used about 25 serrano peppers, garlic, red wine vinegar, spices and some other stuff. Whoa mama!!! Nothing to buffer the serrano peppers!
He poured it into an (almost) empty Crown Royal Canadian Whiskey bottle (cute) and I made a label for it on my PC.
Hope it doesn't instantaneously combust in the fridge.

Sunday, August 15, 2010

BIRTHDAY "MONEY TREE" FAKE CAKE

Adding a picture of another "money tree fake cake" I created for a large birthday party being held this weekend.
It's only two layers this time with the slot for the birthday cards in the center of the top layer. I love the ribbon with the stars and swirlies, very colorful! I added some glittery metallic stars garland over the ribbon giving it some glitz. The topper is made with a square piece of styrofoam, wrapped it up with the same ribbon, placed some crinkle paper on it then inserted some birthday picks and some metallic frills. I was very happy with the end result.

This is a close-up of the cake topper.

Friday, July 2, 2010

MONEY TREE (fake) CAKE

For any party that needs a money tree....well, instead of a tree, why not make a fake cake! Decorate it to match the party theme and the guests can drop their (money filled) cards into a slot on top of the cake where they safely stay until you are ready to remove the contents. It looks so much like a real cake and will look really pretty on the gift table.I made this one for my niece for her "Quinceanera" this upcoming weekend.
I used hat boxes that I had purchased at my local craft store. If you are interested in making one, you can find the instructions in my October 2009 blog post.

Here is the cake in action at the Quinceanera.


This is the before picture, I used Taping Compound (from hardware store) for the frosting. It's in powder form and when mixed with water it looks just like real frosting and spreads on just like the real thing too and it dries rock hard, at which point you can brush paint it or airbrush it. I simply gave it one coat of white Gesso.
Here is the top view of the cake, before and after.

Monday, June 14, 2010

QUINCENERA CENTERPIECES part 2


This second picture is the finished project. So much fun to make! 20 made, one for each table.
As you can see I designed it so that the yellow tulle looks like a delicate cloud on which she is standing. These pieces are meant to be 'take home' memento's for guests.

Sunday, June 13, 2010

QUINCENERA CENTERPIECES


I've been working on some centerpieces for a Quincenera for my niece. Her celebration is next month (July). One thing for sure is that a lot of hot glue is used! It's really fun to make these. Here is a before picture where you can see most of the materials I used, which can be bought at any craft store or a floral supply place. I made 20, one for each table.

Thursday, May 13, 2010

Zebras

My sister-in-law, Olga, decorates Reception Halls, Ballrooms, churches and such for special events such as weddings and Quinceanera's and other special celebrations and she was working on a Quinceanera that had a theme of Zebra stripes along with the color Magenta. She had 4 flat carousel horse shaped wood cutout blanks that she asked me to paint like Zebras. I did just that and see how beautifully she created the backdrop set for the Quinceanera and her escort, flanked by 2 of the painted Zebras. That ballroom looked so beautiful.....pictures just don't do it justice.She did an outstanding, beautiful job.

Wooden Zebra blank before painting stripes.

Wednesday, May 5, 2010

HOME MADE DRESS FORM part 3


Yay!!! Here is my finished homemade dress form!!!!!
I think it looks pretty good even if I do say so myself. I dressed it up in the bustier I dyed and decked it out with some vintage jewelry. So, I guess I don't have to buy a dress form after all......just make it myself!