Sunday, March 5, 2023

EASTER WREATH

This is my Easter wreath for this year.  I decided on some white Lilies, greenery and  little white floral filler and on one side and a cross with  purple fabric draped on it, on the other.  I love it and it was so simple to create.  I saw something similar on Pinterest. 

I Hope all of you have a wonderful and blessed Easter.


A BLESSED AND HAPPY EASTER TO ALL.

Friday, January 6, 2023

BABY SHOWER IDEA

 Hi guys, here are some great baby shower ideas!  I made some party favors for one of my nieces a good while back but these would still work today! I bought some large lollipops and created "Loser Award" labels depicting a crying baby and attached them to the lollipops for the participants that lost at those funny baby shower games. A consolation prize, so to speak!  I also made some matchbook covers with cardstock on my PC, cut them out and stapled a baby shower mint in each one and gave them out to everybody attending, they were so cute!!!


Wednesday, January 4, 2023

SNOWMAN PAINTING ON GLASS


 I painted this fun, cold winter scene a few years ago.  I used an 8"x10" Dollar Tree picture frame with glass, cleaned the glass really well with alcohol then I used acrylics and painted on the inside of the glass.  I used a black fine point Sharpie to add the shadowing and hatch marks on the front side of the glass. Its been several years and the acrylics are still pretty and vivid. No need for glass paints for this project.  A white sheet of copy paper or any color you choose can be placed behind the painting. In this case I just placed it on a white foam sheet to photograph it.


 Hi! Here are pics of some Fake Bakes I made recently and some from a while back....it really is a lot of fun creating these, just for decoration. I have sold a few pieces which is a nice plus!! 

Here, the cocktail is resin, the cake is Styrofoam and the frosting is spackle.  I was inspired by one that I saw on the net.

Friday, March 11, 2022

Transforming a Wall Hanging With Decoupage

 Hi! Here I am again! I've been creating lots of things and I haven't made time to post  on here but here is one that I made recently.  I had an old wooden wall hanging that I stuffed in the back of my closet a while back, and I decided to transform it a little.   So I pulled it out, cleaned it up, decoupaged it with scrapbook paper, added a few points of interest and added a mirror that I framed.  I am really happy with it and hung in up by my front door so I can check my hair and makeup on the way out!   Here are the before and after pics. 


Tuesday, March 23, 2021

MOSAIC ART

Hi all, I decided to try creating mosaics, I tried once before and made a home address sign and it came out really nice but it was mostly wood and just a bit of mosaic, so to me it didn't really feel like it at all.  I saw a beautiful dragonfly mosaic someone made on the internet and it really inspired me, so I asked my hubby to make a concrete paver and I proceeded to go through the process and this is the end result.  I used tile adhesive and white grout from Home Depot, glass half marbles from Dollar Tree and the rest of the glass bits from Hobby Lobby and Walmart.
I am so happy with it!!  I will be making some more for gifts!

Thursday, January 28, 2021

MORE FABULOUS "FAKE BAKES'!

I just can't stop with these "FAKE BAKES"!!! It is so much fun to create these fake concoctions!! Pictured here are some that I have been making recently! If you too want to jump on this band wagon you can watch tutorial videos, just go to https://www.facebook.com/GlittzAndGlue on Facebook and check it out. The talented and very creative Cristal Gonzales will show you how to create these and many other awesome crafts! I highly recommend it!! Its fabulous ART THERAPY!!!

Monday, November 23, 2020

FAKE BAKES

Hi all, hope everyone is doing well. I have been trying to keep busy during this time and while on Facebook recently, I ran across an awesome and very creative page that featured a young lady creating DIY's and Fake Bakes. Her page is Glittz and Glue. Her name is Cristal Gonzales and she is amazing! So after watching her tutorials, I started to follow her instructions and created some really cool fake bakes of my own! Pictured here are only a few of my fake creations. If you like those and your are on Facebook and want to try your hand at it, go to https://www.facebook.com/GlittzAndGlue

Sunday, November 1, 2020

My current published Children's Books


Sarah and the Little Spider Prince

Alanna and the Forest Fairies

 Hi all!

Here are my current published Children's Books. They are available through Amazon.com and BarnesandNoble.com. I am ready to publish my 3rd book but the pandemic has put a big STOP on my plans. Hopefully it will be out by early 2021. Thank you for visiting my blog!
Light, happiness and peace to you.

Friday, October 23, 2020

PAINTING ON AN OLD SUITCASE

 Here is another make-over I have been working on for a few days...It is an old suitcase that our niece asked me to paint on for her (a long time ago).  It got some water damage a while back so I had to paint on a very rough, bubbled up surface and it has screws in it here and there. I did a little sanding, priming and then painted black. Using acrylics, I painted a night sky background and a silhouette of a horse and a cowgirl. I duplicated the clip art of the horse and cowgirl that I saw on Pinterest (with a few changes).  Our niece loved it very much!!  I'm so happy!


Tuesday, October 20, 2020

OLD MILK CAN....TRASH TO TREASURE


I love breathing new life into old things! With a little love and a lot of elbow grease, it's so fun to transform them into beautiful treasures. This old milk can was in need of a make-over! I was visiting a friend when I saw it on her back porch.  I asked her if I could "fix it up" for her and she happily said yes. 

First it had to be dusted and cleaned thoroughly before sanding. It was free of spiders but had plenty of spiderwebs. No spiders were hurt in this process. Lol! I used a wire brush, sand paper and an electric sander then wiped it down really well with a dry cloth.  Then I sprayed it all over with a Rust Inhibitor that I bought at Lowes. Let it dry completely.  I used White Paint/Primer spray paint and gave it a good coating. I let that dry overnight. Then came the fun part!! I used black acrylic paint for the design. I hand painted the letter and used a stencil for the rest of it.  My friend was very, very happy with the results!! And I was so happy to do it for her!  I'm looking around for another one to "fix up" now!!


Tuesday, September 15, 2020


My Ode to Chocolate  ©2010

Chocolate, so sweet, so rich, so melt in your mouth delectable deliciousness.
I am lost in a whirlwind of decadent delight.
Taste buds dancing with ultimate joy, tickled by unparalleled sweetness.
You, my dear friend, are to me.....
comforting in times of sadness,
delightful in times of happiness,
and uplifting in times of melancholy.
Always within reach any time a need arises.
Never contradicts, talks back or makes a face.
You who never judge, disparage or patronize.
Chocolate, I praise your silent loyalty.
A true friend forever more.
                       ~Sylvia Weaver Rivera


PAINTING DESIGNS ON LANDSCAPING ROCKS


Hi again! 

Well, here we are, September 2020. Still  trudging through the pandemic. Making the best of things. Hope you all are well. I have been trying to get back into my crafting....I see, on Facebook, that a lot of you are painting on rocks so I decided to follow suit. Here are the first two rocks I painted this past weekend. The first, I think, of many more to come. 😉  

The kitty was really a lot of fun to design and paint. The Blessings rock was so easy. I will be sealing the Blessings rock, to place among my flower bushes, in my small garden. Hopefully the rain and heat won't affect it too much after I seal it.  Hope you all are staying busy with crafting too! 😊

Tuesday, June 30, 2020

HOT, HOT SAUCE!

Hi to all, hope you are all doing well.
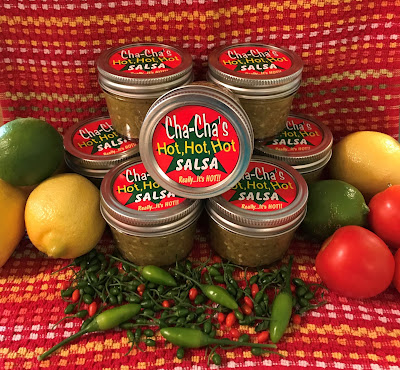
My hubby and I create a very small garden with some hot peppers and tomatoes yearly. So, we decided to make some salsa again and pour it into small jars and give them to our friends and family.  We are going to wait a few months before giving them out this year.  Here is a pic.  I usually make  labels for the jars.  That's my late Mother-In-Law's nick name on the label. We honor her memory this way, she LOVED hot peppers and really hot homemade salsa.
She made the BEST salsa!!  Hot, hot salsa!!
Take care everybody. God Bless.

Thursday, June 18, 2020

Hi everyone, just want to touch base with you all and pray that each one of you is doing well.  We will get through this together.  Please wear a face mask every time you go out.  We need to protect each other.  We pray this will be over real soon.
God bless.

Sunday, February 16, 2020

BABY SHOWER BELLY CORSAGE

This style of baby corsages, pictured below, are very popular right now.  It's worn above the baby bump and tied from behind in a pretty bow.  I made this one for a friend of mine that wanted to surprise the Mommy-to-be with it.  I created it on a wide white satin ribbon, added burgundy and white silk flowers and some faux pearls.  The Mommy-to-be loved it!

Pumpkin Bear

Our little grandnephew needed a Teddy Bear made out of pumpkins for a school project in November, and this was the end result. Just spray painted some pumpkins brown and attached them to each other with skewers.  Used some felt for the outfit, snout and ears then added some googly eyes.  He loved it and I'm sure he got a good grade for it. We sure had fun making it.

Wednesday, October 2, 2019

HALLOWEEN APOTHECARY DECOR


Good Witch table (fake) Apothecary


Bubblegum Machine full of plastic eyeballs and a huge rubber Tarantula 


Hi!   Happy Fall y'all!!  
I have been having fun decorating my house for the Fall, starting with Halloween.  I've set up a witch's apothecary table with all sorts of (fake) elixir's, powders and potions.  I even have a Mortar and Pestle for grinding up herbs and things for a magic spell!
These are just for fun and are not real at all! No magic here!
I also filled up my old bubblegum machine with plastic eyeballs and a huge rubber tarantula!
I used my PC to make the scary labels for the bottles.
It's so fun to decorate for Halloween!

Wednesday, September 18, 2019

FALL WREATH


Happy Fall Y'all!!  I made this wreath last Fall,  I want to put it up again but I have been looking for it in my storage room, craft room, all the closets, just about everywhere in the house and I can not find it!!  I guess I'm going to have to make another Fall wreath for this year.  I really don't know what could have happened to it.  Hubby says he hasn't seen it either.  Oh well, gotta keep an eye out for Hobby Lobby Fall floral sales!

CHEERLEADER OUFIT FOR A TWO YEAR OLD

Our lil' 2 year old niece wants to be a cheerleader!!  Her 5 year old brother plays Soccer and she cheers for him from the sidelines!  So, I decided to make a little cheer outfit for her, I bought
the t-shirt and tutu at Michael's and I used Tulip Glitter Dimensional Fabric Paints to embellish them.
She hasn't seen them yet but I just know she is going to LOVE them!!!
I'm also making a big Cheerleader bow for her hair and some pink pompoms to attach to her tennis shoes!  She will look sooooooo cute!!

Thursday, July 11, 2019

I had this image, in my mind, of a very peaceful tree I could just sit under and meditate, reflect and regroup. So, I created this image...and now, whenever I need some quite time, I close my eyes and sit under my creation that I call my Healing Tree. 

MY NEW CHILDREN'S BOOK...

Hi!  I have been working on my new Children's book for a while, and I have finished writing it!!  Now, I am illustrating it myself!  Not quite done with the illustrations yet, but here is a sneak peek of one of my illustrations....it's a Land Snail that "Danny" the main character in the story is imagining in his mind.  The story is about a young boy who enjoys studying bugs.
Keep an eye on this space for updates on my new book!!


Thursday, August 9, 2018

FAIRY ON CANVAS

I was feeling creative recently and this was the result!  16" x 20" 
I made several but I liked this one the most.  I gave it to a good friend of mine for her birthday.  She loved it. :)


Mixed media, I made the fairy from wire and fibers and a wooden ball for the head. I used specialty yarn for the hair.  I LOVE FAIRIES!!

ANNOUNCING....my latest published book

Hi everyone!  ANNOUNCING my new published book.....

ALANNA AND THE FOREST FAIRIES

I'm so excited to share the news!!!  It is online at Amazon and Barnes and Noble!!!

Synopsis....


Alanna is a sweet and curious 8-year-old girl.  She lives with her family in a quaint cottage at the edge of the Giant Tree Forest.  Alanna has heard about and is fascinated by fairies and has always hoped to see one.  She frequently visits with a widow neighbor that lives on a small farm just over a knoll not far from her home.  The widow seems to know a lot about fairies. Alanna has a kind heart and because of this the fairies favor her and reveal themselves to her.  One of her delightful encounters with the fairies happens at a festival in a nearby village that is held in honor of the elusive fairies.

Thursday, April 5, 2018

ARTSY WINE BOTTLE ART on canvas

ARTSY WINE BOTTLE ART       16" x 20" Canvas
Hi!  I am instructing an artsy class at an awesome Art Gallery downtown in a couple of weeks.  Its a Make it and Take it workshop.  We will be working on  16" x 20" canvases.  
First step is to paint the background, (I used different hues of browns in this one).  Then while the paint is still wet, the second step is to  take sheets of plastic wrap and place it over all the wet paint, wrinkle it up a bit then pull it off.  This technique leaves a really cool effect on the paint.  I used a plastic stencil to make subtle effects on the paint as well.  Then while the paint on the canvas is drying, use Mod Podge to glue cut up pieces of printed cardstock (of your choice) onto a large cardstock wine bottle shaped cutout.  After all the pieces have been glued down, use a black sharpie permanent marker to outline each piece and the spaces in between to make it look like grout.  Once the wine bottle cutout is complete, use Mod Podge to glue it  down to the canvas, making sure it is completely adhered to the canvas.
Once everything is dry, brush Mod Podge all over the canvas to seal it all down.
Then  Voilà!  it's finished!

Thursday, March 22, 2018


Hi guys!  I created this year's Easter Wreath recently using items from Walmart and Dollar Tree. 
Very cost effective, as opposed to buying an expensive ready made wreath!!
I used a grapevine wreath, 2 bunches orange Tiger Lilies, small yellow filler flowers, a hot glue gun with glue sticks and a hard cardboard Easter wall plaque.  I placed everything where I wanted them and then hot glued them all down.  I can't hardly wait to start on my Summer Time Wreath!!

Monday, March 5, 2018

DIAPER CAKE FOR BABY SHOWER

Hi!  So glad you stopped by my Blog!

Here is a Diaper Cake that I made for a friend of mine a little while back.  I hadn't realized that I hadn't added it to my blog, so here it is.  I used newborn diapers and formed them into 3 different sized rounds, holding them in place with large rubber bands.  Then I placed them one on top of the other, forming a 3 tier cake. I inserted a dowel rod down the middle through each tier all the way down (from the top down) to make sure they don't slide off each other.  I then wrapped large burlap ribbon around each tier, same with matching twine, added some burlap ribbon bows I made.  I stamped a cute owl on brown card stock, glued a burlap circle behind it then glued that to a larger round card stock and glued to the front top tier.  Since it was going to be a girl, I used pink crinkle on top of each tier.  The young couple loved it!!


Saturday, March 3, 2018

WALL DECOR

Hi guys!  Here is a little grouping of items that I put together on my bathroom wall.
I bought the bicycle at Pier 1 Imports and the door and picture frame (with attached shelf) at Dollar General.  The picture frame is for photos but I inserted an inspirational quote instead.
I think I will switch out the wreath on the door with seasonal themes.
I am so happy with how it all turned out.  Total cost $11.00

ART

These are some of my Pour and Paint Art canvases.
I love this medium!


Wednesday, January 31, 2018

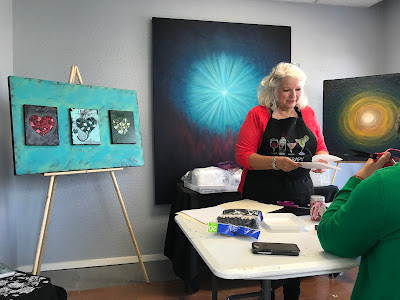
The painting behind me and the one on my left were created by another artist.  The teal canvas  painting, with the hearts, on the easel to my right, is my creation.  Those mosaic hearts were the focus of my workshop.

Hi guys!  I am very excited because I have been having some Creative Art Workshops at a wonderful local Art Gallery. It has been so much fun painting and crafting with some very awesome people!! 

Teal and white Christmas wreath 2017


Hi guys, a little late but I'm posting this pic of my Christmas wreath.  Love these colors!!!  Made this one just like the one I posted for the Fall.  I used some materials from the Dollar Tree and some from Hobby Lobby.
The wooden plaque is from Dollar Tree .

Saturday, November 4, 2017

TURKELFEN


You've heard of Turducken, well, introducing...Turkelfen!  This is what happens when Thanksgiving and Christmas are intermingled too much!!  LOL!!   
This is what happened on my crafting table this morning!  
The turkey head is off a headband with two turkey heads on it and the elf legs are a Christmas ornament I got at the Dollar Tree.  I have Thanksgiving stuff and Christmas stuff on my crafting table and these two were on top of each other and that's when I saw it, so I glued it together and the Turkelfen was born!!  LOL!!

Wednesday, October 25, 2017

SOCK SNOWMAN

I have seen sock snowmen on crafting sites and just love them.  So, I decided I would try my hand at it!  I went on Youtube and watched 5 or 6 tutorials on "How-to" create these awesome snowmen.
I got lots of information and tips.  These are the supplies I went out and bought.....

White socks, men's large
Christmas Women's socks* for cap and scarf
Raw White rice for filling
Embroidery floss 1 skiem
Assorted Christmas embellishments, small, such as snowflakes, buttons etc.
Pink blush and small brush for applying blush, to give him or her rosy pink cheeks
Small black beads for eyes
Small Jingle bells
Red pompoms or any color you choose
Hot glue gun and glue sticks
(You can also use Fleece, Felt or Flannel to make the cap and scarf)*


Lay the sock flat and cut across just below heel.


You will be using the top part of the cut sock.


Turn it inside out.  Gather it at the top and take a length of floss and tie it up tight.  Make sure to tie it up really secure.


Turn it back right side out with the gathered end inside the sock.


Fill up the sock with rice.  Push down on the rice and make sure it is firm and full.
(The snowman behind the rice jar is being snoopy, he wants to see what's going on)


Take a length of floss, gather the top and tie it securely.  Trim floss.


Using your hands, form an indention for the neck area then use the floss to tie it while forming the neck. Tie it securely.  Trim floss.  The snowman form should be nice and firm.  Do not make the neck too thin because it will flop over.  Nobody wants a floppy headed snowman!  Lol!


Use a Christmasy sock to make the knit cap, cut off a long enough piece of sock lengthwise for the scarf, tie it around the neck.  Cut off part of the sock for the cap,( it will look like a tube) gather up one end making that the top of the cap and tie it with the floss,  and fold up the other end to make the band of the cap.   Glue a pompom onto the gathered top and add jingle bells .... or not.  It's your choice. Once you have the cap positioned the way you want it on the head, glue the cap to secure it.

*You can also use Fleece, Felt or Flannel for the cap and scarf, but you might have to sew a little.  I don't like to sew, I can't even sew a straight line nor do I want to!  Ha!!

So, there you have it.  Pretty easy right?  And lots of fun!!  Use black beads for the eyes, you may also add a nose and a mouth if you'd like to.

Now you can make more snowmen and decorate them with bells, buttons or bows to your hearts content!

Thank you for your interest!  Have a blessed Christmas Season!

Sylvia